Thursday, December 31, 2009

Nutcracker Ballet Shoes


Happy New Year!!!
I'm finding quite a few things that I never posted since they were Christmas gifts. This is a pair of my daughter's ballet shoes that she wore for one of her many Nutcracker performances. She must have 20 pairs of pointe shoes that are just hanging in her room. I think about all the $$ that we spent on those things - from $92-100 for each pair! So, I decided to put one pair to good use and dress it up a bit for her to hang on the wall in her apartment. I saw the idea on the front of a magazine several months ago (can't remember which magazine it was) and knew I had to do it. I got out my handy dandy 3-in-1 glue and went to town covering the shoes with some red lace I picked up at Joann's. I then got out my brown and red beads and started hand beading the shoes. After I FINALLY got done with one shoe....I decided to glue the beads on the other shoe! Much better idea and much faster. And it looks great! I had some red tassels in my stash so glued those on. Then I made a double bow and glued it on. I had some red velvet trim that I finished off the inside edges with. I tied red ribbons on and I was done! I was going to put some red felt inside but decided I would wait and ask her first. She didn't want the felt inside. She wanted them to be "worn" rather than to look new. This was her FAVORITE Christmas present!!! They really are gorgeous in real life!

Wednesday, December 30, 2009

Happy New Year!


I'm back! We did our holiday several days later than everyone else and then it was my 30th wedding anniversary so we have been quite busy. I hope everyone had a wonderful Christmas and Santa brought you lots of goodies for papercrafting. I got a new camera so I hope my photos will start being a little sharper. It may take awhile for me to figure things out though!
I had a few minutes and have been dying to try some new stamps I got awhile back from here. I just love them. They are tiny "peg" stamps and you just stamp each individual flower, leaf and vine separately anywhere you please. The "LOVE" is also a stamp by the same company. I am hooked on these stamps and you will be seeing more projects in the future using several more sets I have! The DP is from last year and I don't have the designer for it. It was a 6 x 6 square that I got in a packet of Valentine papers. The lacy heart design on the bottom is a new Martha Stewart punch. I want to thank everyone for following my blog this past year! You have given me so much motivation to keep BLOGGING and CRAFTING! I wish you the best in 2010! See ya next year!!!

Thursday, December 24, 2009

Merry Christmas!

Here is a gift I made using one of those metal tins from Michael's. I put a ribbon around the bottom edges - it fit perfectly! The top is decorated with a scrap of DP and some sewing images that I stamped and cut out. I made a BowEasy bow and I was done! The inside of the box is full of sewing goodies for quick minute repairs.

Merry Christmas!


This is a cookie cookbook I made using a photo album I purchased. I wanted the book to have the plastic protector on it so the cook doesn't have to worry about messing up the cover or inside pages. I just put a square of fabric between the plastic cover and the book for the front. It's not even glued down! The inside pages are some of the recipes for my holiday cookies. I cut out 6 x 6 pages and then decorated them with anything I could find! The recipes were typed on the computer and then printed on cardstock. Merry Christmas!


Merry Christmas!

Wishing you a joyous Christmas this holiday season! I imagine most of you are done with your Christmas as you are reading this. I hope Santa was good to everyone! We won't be doing our Christmas for a few more days yet. So, I've got a bit of time before our big day! I'm going to be posting several Christmas gifts that I have made over the past few months. I didn't want to spoil Christmas for some of my readers!
Here are a few day planners I made and really enjoyed doing them once I got through all the printing of the many many pages! That was a bit of a challenge at times but I got through the printer and computer issues and came up with some nice books! I used the floral images that you see on the front of the book...throughout the book as well. There are about 12 different images so it was great having a different flower for each month. I stamped the musical background and then distressed it. I also stamped some antique wording along the side of the floral design and then distressed the whole image a bit. The gold corners are done using my Home Pro. I bound the book with my Bind-it-all. My inspiration was from a class that was taught by Marta at Creative Quest in Glendale, AZ. I wasn't able to take the class but have used ideas from the class for my books.


Text

Sunday, December 20, 2009

Table Settings

The big day is almost here for most of you! We'll be doing ours later once again this year to accomodate my husband's work schedule. He usually is flying on all the holidays so we just celebrate either earlier or later.
This is one set of my placecards and napkin rings for my holiday table. I'm slowly getting them done! They were cased from Jerri Jiminez on her blog " A touch of grace". She does outstanding work and mine don't hold a candle to hers but at least I tried. They were made with brass stencils that were embossed on ivory cardstock through my Big Shot machine. I then took some Holiday Garden tapestry stamps and stamped the flowers. I then used a glue pen to apply glitter to everything, one color at a time. The centers are cut out with nesties and then popped up with dimensionals. I cut some individual flowers and leaves to put on the center circle. The edges are all outlined with a gold metallic pen. There are gold metallic beads in the centers of flowers and a few metallic BowEasy bows on the sides. Very elegant but not easy and not quick!!! Hope you have a wonderful last few days before Christmas!

Friday, December 18, 2009

Holiday Cheer


I'm still working on xmas cards! I did 4 of these today to go along with some gifts for friends. They are made with JustRite stamps and colored with Copics. The ribbon is silk ribbon tied with BowEasy. Papers are by K & Co. Hope your holiday shopping is about done! It's going to be a crazy weekend for last minute gifts! Have a good one!

Wednesday, December 16, 2009

Gift Bag/box


This is a gift bag and box combination that I made using directions on SCS not long ago. It was one of the daily challenges. The front and back of the bag are Bazzil tags. They have been attached to an open box that I made to fit the tags. I then just decorated it with various stick-ons I had laying around amongst my messy Christmas stash! The inside is filled with candies. Pretty cute and easy.

Monday, December 14, 2009

JOY


I thought I had better check in again! I've just been so busy trying to catch up on things that I really haven't spent any time in my craft room. This is something I made a few weeks ago and never posted. It was going to be a gift but I decided to keep it! I got the wood letters at Michael's. They were painted white. I then just traced around them onto various scraps of DP. I glued them on and then started decorating! There are all sorts of stick-ons that I had so I put them to good use. This was really quick to make and the picture does not do it justice!

Thursday, December 10, 2009

Candy Bar Wrap Up


I hope your day went better than mine! At least I ended mine on a good note! Just got back from a holiday Christmas party and got lots of goodies for being one of the top in sales in my district - one of the largest in the country! I am #32 in sales for selling Avon in our district of over 2500 reps. I might add that probably the top 15 all sell in flea markets or stores so that is what I have to compete against! Very unfair as I only sell to regular door to door customers! I was pretty pleased with that and got lots of rewards so that is always fun!
OK...this is a Butterfingers candy bar that I covered in red cardstock and then just cut out an image from some old Debbie Mum paper. I added a JustRite tag and tied it to a bow - and I'm done! It took all of 5 minutes! And that's about all the time I have today so that was good! Have a great day!

Wednesday, December 9, 2009

12 days of Christmas

Today I am posting something I made several weeks ago. I'm really short on time this week so remembered I had several things that have not been posted. This is one!

These photos REALLY do not do this project justice. This is a "12 days of Christmas" box that I made and I actually did 2 of them but forgot to take pictures of the other one before it got shipped off. The box is already put together for you (Karen Foster). It's just a matter of covering the top and 12 boxes inside of it. I put ribbons on each box for pull tags since the boxes fit extremely tight inside. I used lots of stick-ons and various other embellishments I had. The numbers are done on my Silhouette machine - they were printed and then cut out. The DP's are all by K & Co and are very glitzy and beautiful. I wish I was a better photographer!!! It really is gorgeous! Hopefully I can find a few minutes tomorrow to post but it might be tough! I have another xmas party to go to tomorrow and one at my house on Friday so it's kind of crazy.

Monday, December 7, 2009

White Crhistmas


And I thought I was done with my Christmas cards! What was I thinking! This is actually for a friend who wanted a special card for her daughter. So, this is it. I love how it turned out. The tree is embossed in gold and cut out. It's a Penny Black stamp. It is then placed on another dry embossed design from a Cuttlebug folder. Then it is backed with a gold cardstock. The next layer is another dry embossed SU folder of pointsettias. I took a gold metallic pen and dotted the centers of the flowers. Again, it is backed with gold metallic cardstock and placed on the card. The sentiment is a gold rub-on. Simple, yet very elegant!

Saturday, December 5, 2009

Sled giftcard


I found this cute sled idea on SCS and thought it would be perfect for a male recepient's gift card. The template for the sled can be found here - Finebear's blog. The gift card is between the rope handles in a pocket created under the slats of the sled. This went pretty fast and turned out pretty cute. Have a great rest of the weekend!

Friday, December 4, 2009

Glass Ornaments


I had a few minutes in my craft room today so decided to work on these glass ornaments I got from Michael's quite awhile ago. They are flatish round ornaments which makes it much easier to work with. I wish I could say that I stamped these cute snowmen on them but I didn't. They are rub-ons that I got at Michael's too. They are $1.29 for a set of 4. There are candy canes on the backs of the ornaments and a few holly berry leaves here and there. They were very simple and really cute! They are all glittery too! I glued bows at the tops and they are ready to go! Have a great day!

Thursday, December 3, 2009

Christmas Bells

Well, it seems it is getting harder and harder to find time to craft! I have so much more to get done by Christmas. Hope you are doing better than me with your holiday crafting! This is another Christmas card to go with a tag for a cookie gift set. When I get it all together, I will post it. This was made using JustRite stamps. The DP is Graphic 45, Christmas Past Collection. The punch down the side is a new Martha Stewart punch. The ribbon is made with BowEasy.

Wednesday, December 2, 2009

Party Favors


I'm have a Princess House party next week and thought I would do little favors for all attendees. Here are a few of the ones I have come up with. There is a tall box on the left with candies in it and decorated with DP and JustRite Stamps. I think I got the box from Clear Bags. Behind it are a few bags with gift tags inside and also some candies. The bags have a SU "Top Note" bag header and JustRite stamped sentiments. The tall tags to the right are Bazzil tags that have xmas stickers on them and I stamped "TO" and "FROM" on them. Ribbons are threaded through the holes at the top. The peppermint box on the far rights has a belly band around it. The center circle is a bottle cap that has a stamped Thomas Kinkade image inside. I colored it with Copics and glittered the snowy areas and then put some Crystal Lacquer on it to make it shine. The outside of the bottlecap is a JustRite stamp. The center front bag has candy in it and a few very SIMPLE $1 Michael tags. The top of the bag is another" Top Note" diecut by SU. Most of the DP is by Debbie Mum. These were all pretty quick to make.

Tuesday, December 1, 2009

TeaLight Lollipops!


Aren't these just too cute! They are lollipops made from tealights. They are wrapped in plastic lollipop wrappers that you find in the candy section of Michael's or any craft store. The sticks are also there and are just glued to the back of the tealights. I then punched out a circle to cover the back of the lollipop where I glued the stick on. The sentiments are JustRite stamps that are layered with various size punches. My tealights are from Gold Canyon Candles and they have the clear holders rather than silver like most. Have a fun day!

Sunday, November 29, 2009

Christmas Ornaments

These are some pretty quick ornaments that I'm making to go along with gift bags of cookies for friends. They are made with a Spellbinder's pendant that is punched out with K & Co DP. The front and back of the ornament are then stamped with new JustRite stamps. I have the square monogram initial on the front and the sentiment on the back. I tied a ribbon with BowEasy for the bow and then just added a ribbon to hang it from. Pretty cute!

Sunday, November 22, 2009

Grocery Lists

Here are a couple quick gifts I want to share with you. The inside of these are just long pads of lined paper that I purchased from Papertrey Ink. I made a folder to fit them and then just decorated the fronts with various DP's and some punched designs by Martha Stewart. The words were made from my JustRite font sets. The little box opens up to hold post-it notes. I just covered the outside and the inside flap. How fun is that!!!

Saturday, November 21, 2009

Wishing you Sunny Days Ahead!


This card was made using a design from my Silhouette SD. The white lacy top and bottom were done on it. If you are looking for a fun gift for Christmas...I give it 10 stars! Every week they come out with about 30 new designs and they have now teamed up with Hero Arts to do designs that go with some of their stamps. Should be interesting! Anyways...the stamp is by Inkadinkado and was colored with Copics. I added a few pearls to the flowers and to the lacy design. There is a sheer bow at the bottom of the stamped design - look hard! It's a much prettier card in real life! The DP is by K & Company and is actually in a Christmas package! Pretty bizarre! I guess there are a few snowflakes on parts of the DP! Have a great day!

Friday, November 20, 2009

Thanksgiving Card


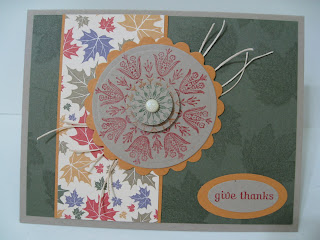
Another Thankgiving card at the last minute! I picked up this set of stamps on 70% clearance at Michael's and wanted to try it out. The medallion is by Inkadinkado and the "give thanks" is from SU. The green paper is stamped with Versamark and is another of the Inkadinkado stamps in the set. The papers are SU. The medallion is stamped in several colors and layered with dimensionals. The strings are actually called Scrapper's Floss! MORE to come tomorrow!

Thursday, November 19, 2009

Recipe cards


I make about 20-25 different kinds of cookies, candies and cakes each holiday season. I decided I wanted to put my favorite recipes in a book. I purchased a 6 x 6 photo album so I could use the pockets to put my recipes in. When I am baking cookies, my recipes have a tendency to get splattered with everything so this protects the recipes. That is the glare you see in the photos! Anyways...these are a few recipes I have put into my book. I print my recipes on the computer and then just mount them on cardstock and various scraps of DP. These are really quick and fun to do. I'll be making a few more for gifts too.