Wednesday, December 22, 2010

A Texas Christmas Card!


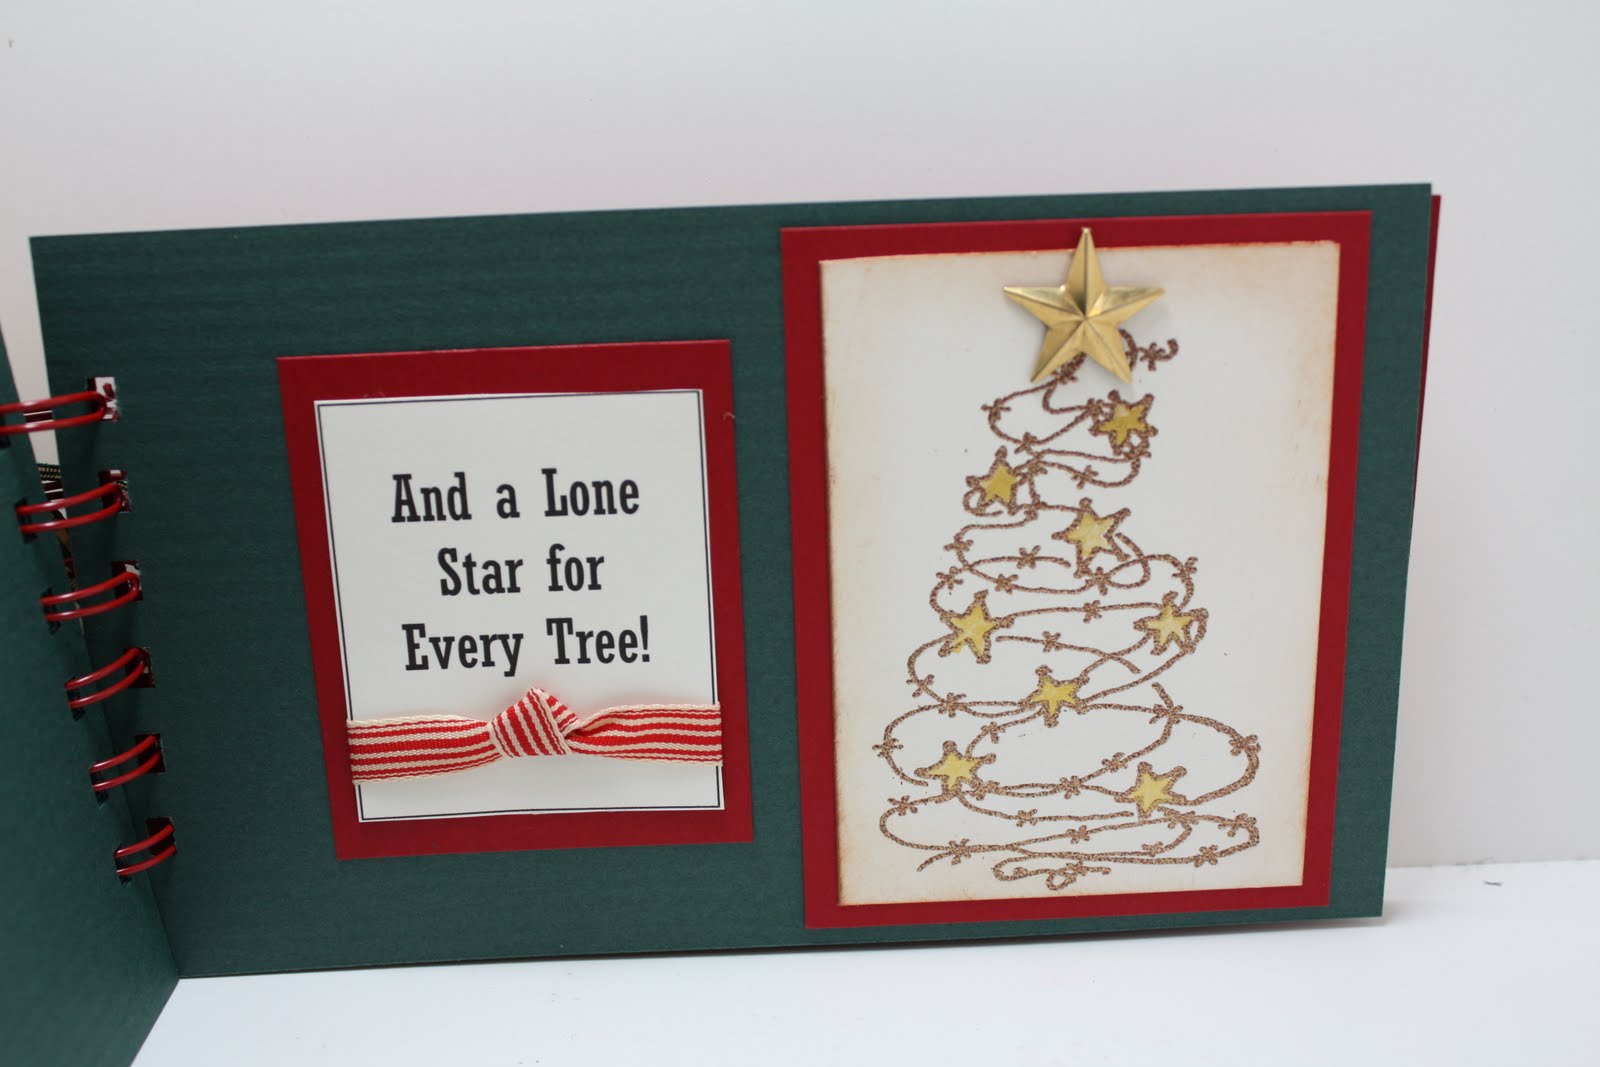
I hope you are almost finished with your xmas shopping and craziness of the preparation for the holidays! I have several things to post that I made several weeks ago that I was saving until after they were mailed out. This is an adorable (at least I think so!) Christmas Card book that I made for my son and his wife. He was born in Texas and went to college FOREVER in Texas so I think he claims to be a Texan. He asked for some land in Houston for xmas so I think that means he wants to go back there. He is in pilot training in the Navy now so is stuck in Oklahoma for awhile - and enjoying it! And NO, he won't be getting "land" for xmas - at least from us!!! So, ANYWAYS...this is a little book that I made with the 12 days of Christmas - Texas style. I ordered the kit from Stamp Salado in the Austin area of Texas. I just HAD to have it and the ladies were kind enough to send me the kit from a class they were teaching there. Most of the stamps are from Dead Beat Designs. These are just a few of the pages of the book but it gives you an idea of the rest of the book. Most of the pages are embossed and sparkly so it's really a cute book. The edges are distressed.
Merry Christmas!

Sunday, December 19, 2010

JOY


Here are a few pics of my church! That is a HUGE pointsettia tree and it is so gorgeous! The pictures do not do this beautiful church justice. I just had a few minutes between services to take the pictures so there wasn't any time to adjust camera settings - not that I would know how!!!
And it brings me such JOY to be a part of my church! SO, what a great time to show you a gift I made for several friends. It is actually white wood letters about 5 inches tall that are covered with various scraps of holiday papers and embellishments. I made a few last year and really loved them so did them again this year.

Thursday, December 16, 2010

Holiday Favors

I'm back with a few holiday favors that I made from ideas posted on SCS. I wish I jotted down where I saw them but I didn't. It's been awhile too so if you are the creator of these ideas...let me know and I'll be happy to give you credit. These are really pretty simple boxes that are covered with a scalloped nestie and then decorated. The Thanksgiving one was embossed and then I added a few SU stamped leaves and a button and twine. The second favor is a Santa made with punches. It's quite clever! I embossed the nestie with snowflakes. I will fill these with holiday candies for my dinner plate favors.
Life has been pretty busy around here with my hubby's physical therapy and broken back but hopefully next week they will give us some good news - and that would be that he is healing properly. Please remember him (Bill) in your prayers. We really don't want to go through back surgery and then start all over with the healing process.
We are also planning to move to Colorado and are working on cleaning out our house in preparation for that. So, my crafting time will be at a minimum for awhile.
I wish everyone a Merry Christmas and a joyous holiday season with your families all across the globe!

Sunday, December 12, 2010

Snowmen Treats

I'm going to sneak in here tonight and post these adorable Snowmen Candy Bars I made. These are so simple to do. I found directions here. The image was actually printed on the computer and then just cut to fit the bars. I sewed up some hats from some scrap fabric I had. I added a few buttons and twine here and there and that is it! I think they will be a hit, what do you think?

Tuesday, December 7, 2010

Believe

Wow! It seems I have been gone forever! I was having problems with my blog the last time I was on and it's all better now! I think it must have been a "Blogger" issue. Boy did it frustrate me to no end!
So, I'm back with my post - finally. I have been so crazy busy and I haven't even started my xmas baking yet. I have not mailed any packages yet. I have not done my xmas cards. I still have lots of shopping to do. So, what have I been doing, you may ask? Well, my hubby has become inactive with his broken back. So, I guess his leg tendons froze up and now he has achilles tendonitis and can hardly walk. We spent the day in 2 doctor's offices and got some shoe supports and perscriptions. He will start physical therapy for that tomorrow - 3 times a week for 3-4 weeks. Of course he is unable to drive so that means I get the honors of spending several hours a day driving him back and forth and also waiting on him. About the time we finish that therapy, his back therapy will start! There is no end in sight for several months! Then my daughter has hip surgery in January so I'm not sure yet if we will be able to help her out or not. It would be like starting all over again - for me!
SO... this post is for a fun project that I made for a Christmas wall hanging. The kit is fairly quick and easy. Everything is included and there are lots of extra papers. It uses Graphic 45 Christmas papers. The kit is by Pine Cone Press and they have so many cute ones. I have ordered several kits from them in the past and loved all of them. My picture does not do it justice. I hung it in my craft room to photograph it where there is more light but it is so big that you really can't see the detail. Here is a link to another idea for making it and also the company.
Hope you are finding time to do all your holiday fun projects! I hope to have several more postings next week - once I can get things mailed out! Have a great day and thanks for not giving up on me!

Wednesday, December 1, 2010

I'm still around...


Just wanted to let you know that I hope to have a posting soon! My daughter and her husband were here for 9 days so I spent most of the time in the kitchen rather than the craft room. I've also been pretty busy with my husband and his broken back. It's like having a monstrous toddler around - having to dress him! Our beloved "Muffy" died the day before Thanksgiving so it's been rather sad around here. She would have been 15 on Thanksgiving Day. She was such a sweetie and will be missed.
My postings will be few and far between this month as I have lots to catch up on and tons of cookie baking to do. I usually do about 25 different kinds of cookies but hope to cut back this year. Not sure I will have the time with everything else I'm doing.
I do have several things I have been working on the past few days so hope to get those posted soon. I'm hoping my blog doesn't disappear! My signature disappeared somehow. I haven't been on my blog in over a week and when I went on today, it was gone! I hope it's not a sign of things to come!
Have a great week and stay tuned!!!

Sunday, November 21, 2010

Welcome

I'm going to an adoption shower next week for a crafting friend who is adopting a 3 year old girl from Ukraine. She had no idea how old the child would be or the sex of the child or how many children she would get when she left the US. So, she needs everything. This stamp is one of my favorites and I thought it was appropriate for this occasion. I think this may be a Sugar Nellie stamp but I can't remember. I don't label all my stamps - too much work and I'd rather just stamp and not worry so much about the company name etc etc. I've used this stamp many times so you can scroll back and probably find the company that makes it if you wish. I'm a bit short on time this week with my daughter and her husband here for the holidays. They left for the afternoon so I am getting to sneak into my hide-out and play a bit! The papers are Indian Summer by BasicGrey. Hope you have a wonderful week and enjoy your Thanksgiving Celebration!

Monday, November 15, 2010

Snowmen Cards


I found the cutest little snowmen stamps at my favorite local stamp store and I honestly did not need them but HAD to have them! You know how that goes with this hobby. I have all my holiday cards done early early this year....and after I send them out, I will post them and you will see why I have them done early! This is truly not normal for me!!! ANYWAYS...these stamps are by Stampendous and stamp beautifully. I'm really not a clear stamp lover as the stamp images are not always sharp even after sanding. But, these were outstanding! I just stamped and added a bit of color to them with my Copics. A few cards were embossed. They were all cut with circle punches. They went together rather quickly considering I made 24 of them. I will put them in the clear gift boxes with a ribbon. Have a great week! The holidays are creeping up really really fast so watch out!!!

Sunday, November 14, 2010

My Birdhouse Quilt

OK...for you stampers...I promise I will get back to some stamped things with my next posting. I've just had so many other projects going on and wanted to put them on here as well since many of you are are sewers and crafters.
SO...this is my quilt that I have been working on since February. It was lots of work but all in all, it really wasn't too bad for a non-quilter. I did lots of applique work in my days of sewing little girls clothes so this was easy peasy. There are quite a few embellishments on it - just like in papercrafting! There are buttons, snaps, and some embroidery. I sent the quilt to my expert longarm quilter to truly make the quilt come alive. It's just so amazing what happens when it is quilted! And she does an awesome job so I am more than happy to send my quilts to her. Let me know if you need an expert to quilt your next project!
Have a great week and I hope to be back tomorrow with a few xmas tags/cards.

Saturday, November 13, 2010

Nativity Scene

I made this Nativity scene last night and finished some detail work on it this morning. I saw a class for something similar and couldn't make it to the class so I came up with my own version of it. I had a quilting book for a Nativity Quilt - another project on my list - so I used the applique patterns from it to make this. The chipboard is the 7 Gypsies, Home Sweet Home set. I covered the fronts and the backs of the chipboard with various papers. Then I glued the pieces together. I added some white fuzzies to the sheep for more dimension. I embellished the camel and the angel. The rest was pretty simple cut and glue - yes, it was a bit time consuming too! I punched holes with one of my hole tools and then threaded ribbon to tie them all together. I love how it turned out!
I hope to get pictures of my latest quilt to you tomorrow. It is a work of art. I'm becoming a lover of quilt arts! (thanks to my friend Cathy!!!) I've sewn everything most of my life but never quilts. Almost every stitch of clothing my daughter wore up until about age 10 was handmade. That was the only way we could afford the quality of clothing that I wanted on a military income. She was always the best dressed kid around. Now that my kids are gone and I'm not devoting all my time to them, I can do some things for myself. So, I will show you my latest creation tomorrow!
Have a wonderful weekend!

Thursday, November 11, 2010

Thanksgiving Table Favors

Here is a quick and easy table decoration to put on each place setting. I had to have something quick so this worked well. I found these glittery acorns at the "M" store. I also found the felt sticker leaves there. I just glued the acorns together and stuck the leaves on. I added some twine and a bow. The die cut is by Waltzingmouse Stamps and the sentiment is by Stampabilities. I may add a harvest button to the center of each bow. These are pretty big - maybe 6 inches tall!!! Have a great day!

Wednesday, November 10, 2010

Thanksgiving Recipes

This is a little book I made today with some of my family recipes that I have been using for over 30 years and also a recipe from my Great Great Grandpa. His recipe for Oyster Dressing has been in the family for over 100 years and everyone uses it. It wouldn't be Thanksgiving without his dressing. So, I made this cute book with the history of all my holiday recipes. Tomorrow I will show you my table place settings for Thanksgiving since we won't be going to Colorado this year. It's the first time in over 12 years that we have been able to celebrate Thanksgiving and Christmas on the actual day! My husband is a pilot so he works EVERY holiday. His broken back is the reason he will be home this year!!! Have a great day!

Tuesday, November 9, 2010

A Doggie Christmas Gift


It's so good to be back on my blog. It's been a tough tough week. My husband fell 20 feet from a ladder while trimming a palm tree on Saturday and landed flat on his back. He has 5 breaks in his back and a broken finger. All are very serious breaks but no surgery is required so that was good. He has a long road to recovery though and can't do anything for a minimum of 6 weeks. It could be up to 3 months to heal! He is home now and doing extremely well. They brought his new body cast today. He can take it off when he sleeps but otherwise he keeps it on. This is one time when I wish I had a little kid around the house to pick up all the things he drops or forgets to bring with him before he sits down. It's a full-time job just keeping up with the stuff he drops!!! Of course he can't dress himself either so I feel like I have a monster toddler in the house!!!
So...I came upstairs to work on my blog and thought the phone might stop ringing for 5 minutes...well, it didn't. This entry has been in the works for the past 1 1/2 hours and it's something I made months ago!!! My tv show comes on in 15 minutes so I'm running out of time!!! I honestly "planned" to do a card. That hasn't happened and won't happen!!! But, here is a gift set for a doggie. It's just too too cute, isn't it? The jar was purchased at Hobby Lobby and I made the paw prints and lettering with my Silhouette and black vinyl. I honestly can't tell you who makes the papers as I've had this made for a few months and never got it put on my blog because it was supposed to be in a magazine and somehow it never made it. They swapped it out for another of my submissions so that is good but I really like this set better. Oh well!
I hope to be back again soon but my life has been turned upside down for the time being so I just never know what I will be doing next. Have a great week!

Wednesday, November 3, 2010

A cupcake birthday

Hope you are having a great day! This is a birthday card for my niece. She is a tomboy so it is really difficult to come up with something for her. I think she is 9 years old so hopefully things will change soon for her. I hope she likes this card! I cased it (with lots of changes) from a new book called "Fun Folds". It has lots of great card ideas in it and this just looked like it would be perfect for her. I think the stamps are from Inkadinkado. It's a cupcake set.
If you get "Through the Craftroom Door", check out page 6! I have a gift set published and it's a quick and easy project. Unfortunately I can not put it on my blog for 2 months so you will have to wait awhile to see it.
Have a crafty day!

Tuesday, November 2, 2010

Sympathy Card


I'm back after a few days off. We had vacation last week and kept busy with projects around the house as well as "dreaming" about another move! We have always wanted to return to Colorado to retire and with Bill's earning years diminishing...we are thinking more seriously about it. So, I've spent way too much time on the computer lately - house hunting.
This was a really hard card to make. My absolute favorite papercrafter's husband died on Halloween evening. I have been following Becca's blog almost from the beginning and am always so amazed at what she comes up with. I feel like I know her so it was so heartbreaking to hear the sad news. My heart and prayers go out to her and her family during this very difficult time.
This is my card for her. It's a navy blue paper that is showing up as black. Everything is navy and white. The stamp is by Hero Arts and I put pearls in the centers of all the flowers. The white background is an embossing folder. The tag is a Spellbinders tag that I have stamped with a sentiment by My Sentiments Exactly. I have also shown the inside of the card with the second half of the verse.
I have so many things I want to get started on for the holidays...and I'm not sure where my time disappears to each day! Hopefully I can get back into the swing of things before the holidays are over!!! Have a great week!

Wednesday, October 27, 2010

Happy Candy-ween!

This is another Halloween card for a friend. It's a stair step card and the directions for making it are in the "Resources" on SCS. It's really a simple card to make with just a few folds of your base card. Then, I just added lots of embellishments, a few stamped images, a few punched edgings, some die cuts....just lots of fun things that I had in my stash. These are really fun cards to make especially if you have lots of embellishments you need to use up!
Have a great rest of the week!

Tuesday, October 26, 2010

I got Boo-ed!


I got BOO-ed last night! It was a good BOO too! I found a plate full of WARM Snickerdoodle cookies at my front door. There aren't too many left today! We managed to devour them! Well, I got a new cookbook a few days ago and was dying to try these new "cake pops". It is an awesome book and evidently just came out. I found some Halloween pops to make and decided to do ghosts - most appropriate for this occasion! They were simple to make but rather time consuming (about half a day of fun and play!!!). I could not find a black edible ink pen like the book suggested for making the faces. I tried the black gel - it never dried so I couldn't use that. So, I resorted to some tiny chocolate sprinkles I had for cookie decorations. They worked. I wrapped the ghosts in lollipop wrappers that I had from other occasions and tied with Halloween ribbons. They are still just too cute....even with the not so ghostly faces! I think the recipients will be happy.

Thursday, October 21, 2010

Frankenstein

Here is another Halloween craft from my friend Becky! Isn't it just TOO TOO cute! It is made from one sheet of cardstock that is 5 inches by 10 1/2 inches. It is scored at the 2, 5, 7 and 10 inch markings on your score board. It is then scored one inch across for the bottom of the box. It's just a matter of folding on folds and cutting all the corners up to the one inch crease to fold the bottom of the box. Hope that makes sense. The black hair is cut from a "grass" die cut! You could always cut your own hair too. The eyes are from 3/4" circle punch and then google eyes are glued on. The nose is a circle punch that I just folded and glued on. The face is made with markers. I found the black shreds at the Party Store - they are hard to find!!! Most stores don't carry black.
Hope you have a FUN FRIDAY!!!

Wednesday, October 20, 2010

A FUN Halloween Project!


A friend of mine came over today and we made this really awesome Halloween Luminaria. The tutorial was on SCS this week but my true inspiration came from a blog by Ila which can be found here. She did an awesome job on her luminaria!!! So, this is our version. The highlight of mine was the sparkly black paper I used. It really MADE it! I used various stamps and also several Halloween stickers. The spider is so COOL too!. This was such a fun project to make and we had such a great time! Tomorrow I'll be back for another Halloween project that my friend showed me! Thanks Becky!!!

Tuesday, October 19, 2010

Boo!

I just have a few more Halloween cards to make and my time is getting short! This is a stamp by The Paper Studio. The sentiment is from Michaels $1 bin. The web punch is by Martha Stewart. The DP is by Cloud 9 Design. Hope you have a great day and hopefully I'll be back tomorrow with a fun Halloween project!!!

Sunday, October 17, 2010

Christmas Bulbs!

I have had these chipboard bulbs for a few years and thought I would find something to do with them! I traced around the chipboard and then just cut several pieces of DP to fit. I cut each of those into pieces and mixed and matched to put on each side of the bulb. I added lots of embellishments - stickers, bling, ribbons, flowers, buttons....and I tied them all together and it was done in a matter of 30 minutes or less!
Have a fun week!

Saturday, October 16, 2010

Frosty Ornaments

Here are some quick and easy Christmas ornaments I made. I purchased the clear ornaments from Michaels. In most stores they have rub-ons for putting on ornaments on the same row. They are just over $1 for a strip to make 4 ornaments and maybe a few extra rub-ons for another ornament. So, these were just rubbed on and they were done. I added a red ribbon to hang from the tree. You could also add some bling or maybe a bow at the top. I felt a bow covered up a bit of Frosty so I left it off.
If you subscribe to "Through the Craftroom Door", you will find several ornaments that I made in the new holiday publication that just came out! Turn to page 6! I will have more work published next month too!
Have a crafty day!